Updated September 2024
One of the most common contributors to a slow website is large images that are not optimized for the web. Optimizing all images to be web-friendly is crucial to your website’s overall health and page speed scores, and can even help with SEO rankings. So what are you waiting for? It’s time to get those images optimized! Let’s do this!
The Importance of Image Compression and Proper Sizing for Your Website
Images are a critical component of web design, enhancing visual appeal and supporting content. However, large image files can significantly impact your website’s performance, leading to slow load times, increased bounce rates, and lower search engine rankings. This makes image compression and proper sizing essential for maintaining a fast, user-friendly website. Below, we’ll cover why checking image sizes before uploading is crucial, provide some standard size recommendations, and guide you on optimizing images using various tools.
Tenrec’s Image Optimization Tools:
There are many automated tools and plugins out there that can help optimize images. At Tenrec, we utilize a plugin called Smush Pro (as part of the WPMU toolkit) on all of our WordPress sites. Smush Pro automatically compresses images uploaded to your WP media library. However, while Smush Pro is a powerful tool for compressing images and reducing file sizes, it’s not a catch-all solution.
A fun feature with Smush allows you to keep track of all the space you’ve saved by Smushing your images too, just so you know how you’re doing:

Smush Pro uses “lossless compression” by default, meaning it removes only “visually irrelevant” data from images. Read more about the difference between lossy and lossless compression here. Smush Pro excels at reducing image sizes but it can’t overcome the limitations of very large initial file sizes. This means the tool won’t be able to substantially reduce a file’s size if that image is already somewhat optimized. Smush Pro won’t compress the file at the cost of image quality. Therefore it’s still a best practice to resize and compress images before they are uploaded even with a tool like Smush Pro in place.
When prepping your images for the web, the goal is to reduce the file size as much as possible, without sacrificing the image quality.
Why Image Size Matters for SEO, website performance and usability
Uploading excessively large images can slow down your website, which negatively affects user experience and SEO. Large image files take longer to load, consume more bandwidth, and can frustrate visitors, causing them to leave your site. While compression tools like Smush Pro can help reduce file sizes, they have limitations—especially with very large images. For example, if an image starts at 8MB, a 30% reduction still leaves it at 5.6MB, which is far above the recommended file size for web use.
Ensuring your images are appropriately sized before uploading can save bandwidth, improve loading times, and enhance the overall performance of your site.
When prepping your images for the web, the goal is to reduce the file size as much as possible, without sacrificing the image quality.
Image Guidelines:
Image file size versus image size / dimensions
One important facet to managing images is the difference between file size and image size or dimensions.
The file size of an image refers to how much data that image contains, i.e. how much space it takes up on your computer or web server and also how much data a browser downloads when it gets that image. This is typically described in kilobytes (KB) or megabytes (MB), sometimes gigabytes (GB). The more pixels an image has and the more information used to describe each pixel is what determines the size of an image file. Some images have tens of millions of pixels and show very fine detail and are very large files. Whereas a small image with only thousands of pixels will make a very small file.
A good rule of thumb is for your large, full-site-width images (aka “hero images”) to be less than 400 KB and other non-full-width images to be less than 200 KB. Image size or dimensions, i.e. the width and height of an image, are typically described in pixels. For example a hero image might be 1440 pixels wide and 500 pixels high while a thumbnail image might be 150 pixels wide and 200 pixels high. The width and height of an image will describe its actual size, how it will look at 100% in an image editor.
But it’s important to remember that an image can be resized by the code on a web page. In other words a 500×500 pixel image could be resized to display on a web page at 100×100 pixels. But this doesn’t change the size of the file the browser has to download. All of the data of that 500×500 image is going to be delivered to the browser, even though a smaller image is being displayed.
Recommended Image Dimensions and Sizes:
- Hero Sections / Banners: Typically 1200-2000 pixels wide. Aim for file sizes under 400KB.
- Supporting Content Images: Usually 800-1200 pixels wide. Target a file size of 100-200KB.
- Headshot Photos: Around 400×400 pixels, with file sizes ideally under 100KB.
- Thumbnails: About 150×200 pixels, usually around 30KB.
Another thing to consider is whether a JPG image or a PNG is more appropriate when optimizing and saving your images. While both are acceptable for the web, PNG files tend to be larger (also known as a lossless compression file format), but are great for things like illustrations or logos, or if you need a transparent background. JPEGs are often smaller files (lossy compression file format) and good for photographs or images with complex colors.
Optimizing Images for Upload to Your WordPress Website
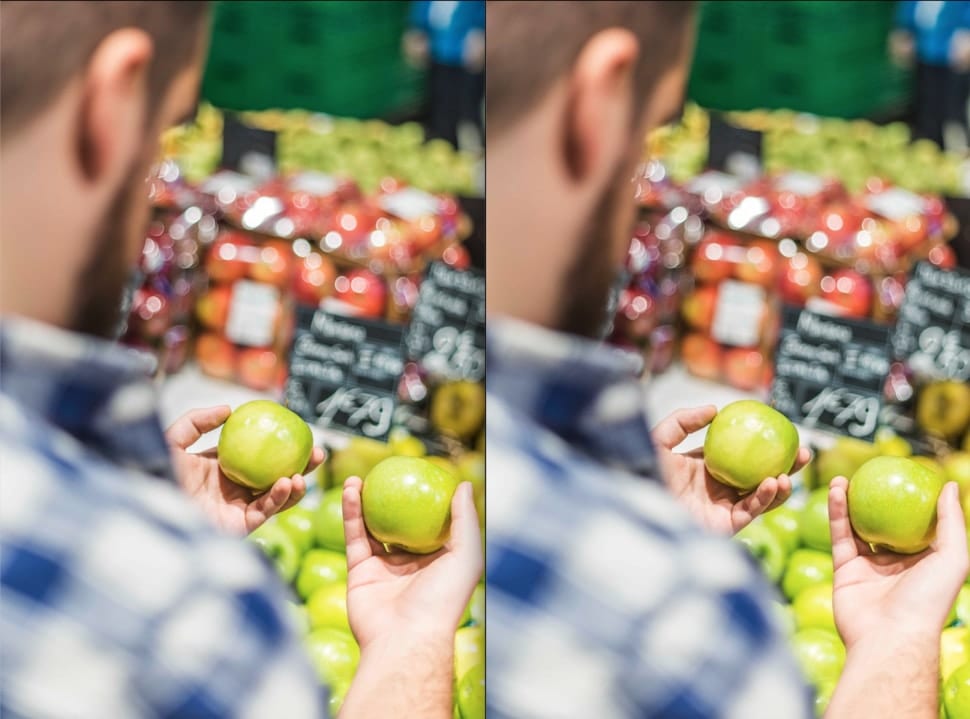
You don’t have to subscribe to a professional photo editing tool like Photoshop to compress or resize your images, you can also use different online tools like TinyPNG or ResizeImage.net to help reduce your file sizes. If you are on PC, you can use MS paint, and if you are on Mac the “Preview” app also has built in resizing functionality. See this example below of an image before and after being optimized. The one on the left is the original and was 834 KB. The one on the right was compressed with ResizeImage.net and is now 127 KB. This is an almost 85% savings, but to the human eye there isn’t a noticeable difference in quality:
Updating Protocols for Image Upload
To ensure optimal website performance, it’s important to establish clear protocols for image uploads.
- Resize Before Uploading: Always resize images to the appropriate dimensions for their intended use (e.g., banners, content images, thumbnails).
- Compress for Web: Use online tools like TinyPNG or JPEGmini to further compress images, or IrfanView (PC) and Preview (Mac) after resizing to minimize file size without losing quality.
- Check File Size: Ensure that all images are under 1MB. For best results, aim for even smaller sizes where possible.
- Use Correct File Formats: JPEG is generally best for photos, PNG for graphics with transparency, and SVG for logos or icons.
By following these guidelines and resizing images before uploading, you can maintain a fast, user-friendly website that provides an optimal experience for your visitors.
If you need assistance compressing your images, reach out to your Tenrec Account Manager or account_services@tenrec.com for help on this and other topics.